The Ultimate Guide To Creating A Stunning Gallery Wall
This post may contain affiliate links. If you make a purchase through one of my links, I may make a small profit at no expense to you. For further information, please view my policies.
DECOR TRENDS COME AND GO, BUT WE WILL NEVER STOP HANGING ARTWORK IN OUR HOMES! LET’S LOOK AT HOW TO HANG A GORGEOUS GALLERY WALL!
You know what the true beauty of a gallery wall is? No two are the same. They are like the thumbprint of your home 🙂
What you choose to hang on your wall can really speak volumes about who you are and what you love!
While it’s true that there are no hard and fast rules to creating a gallery wall, it’s also worth mentioning that nailing a professional-looking gallery wall is kinda hard.
It’s all about striking an incredibly delicate balance between perfectly curated artwork, suitable frames, proportions, a balanced layout, *and*, as if that wasn’t enough, having it mesh with all the surrounding elements in the rest of the room.
But we shouldn’t let all that deter us from making our own awesome gallery wall, so let’s jump right in!
4 Stages to Planning Gallery Walls
There are a few different steps that go into planning a gallery wall – I tried to break it down so it’s easier to figure out what stage you might be at right now.
STEP 1 → Select a gallery wall layout
STEP 2 → Choose what artwork you will use
STEP 3 → Decide on frame style(s)
STEP 4 → Hang everything up!
Of course, you might not follow this exact order!
You might already know what artwork you want to feature, but maybe you’re still figuring out the best layout. That’s ok!
Design is seldom a rigid, straight-line process, so just take things in whatever order fits you best.

What is your design intent?
When you begin to plan your gallery wall, it really helps to know what your design intent is.
Having a (somewhat) clear picture of what you want to achieve will help you stay on track throughout the process.
So start by asking yourself these questions, and try your best to answer them:
- how do you want your gallery wall to make you feel?
- are you going for a particular color scheme in the artwork? Ie black and white, pale pastels, neutrals …
- do you want to follow a gallery wall theme?
- what kind of layout are you drawn to?
- are you concerned about the colors in the artwork coordinating with the decor in the room?
- do you need to frame everything or just some of the pieces?
- should the frames all be the same color?
- do you want a variety of different size frames or should all the frames be the same size?
- do you already have all the artwork you need?
- if you need to purchase art, do you want to buy original artwork or prints?
- which pieces will be matted and which ones won’t?
- do you want to hang any other types of objects other than traditional artwork on canvas/paper?

After considering the above questions, jot down your thoughts. Here’s an example of what you might end up with:
“I want my gallery wall to look calm but also eclectic, with an emphasis on graphic and abstract art. I want the artwork to feature mostly neutral colors and I want to use primarily light-toned wood frames. I am drawn towards a free-form gallery layout. I‘m going to create some of the art myself and also buy some prints.”
If you’re feeling overwhelmed right now, don’t worry! We’ll go over a lot of these points throughout the article, so just try to keep them in mind.
So long as your gallery wall is a collection of things that bring you joy, you can use anything you like: your kid’s artwork, your own artwork, prints, postcards, letters, photos, a feather sculpture, a woven tapestry… you get the idea!
Experiment, and find what makes YOU happy!
Planning the Gallery Wall Layout

There are a few ways you can plan the layout of your art wall:
METHOD 1: Pick a layout template that already exists and just copy that.
METHOD 2: If you already have all your frames, lay them on the floor or on a big table in front of you. When you’re happy with how it looks, take measurements and transfer them onto your wall. Don’t forget to take a picture with your phone for reference!
METHOD 3: Use paper templates on the wall to figure out an arrangement that you like. Trace your frames onto some paper to make templates of your frames. Cut out the shapes and tape them onto your wall to perfect your layout.
METHOD 4: Take a frontal photo of the wall where you’re planning on hanging your art wall. Then bring it into a photo editing program and roughly sketch out a layout. It doesn’t have to be pretty, it just needs to make sense to you.
Types of Gallery Wall Layouts

When it comes to hanging the artwork, you may just want to wing it and of course, that’s totally fine. (By “winging it”, I mean throwing everything up on the wall and deciding on layout, measurements, and spacing as you go.)
But my suggestion to you is: don’t pick up a hammer until you’ve decided how you want your arrangement to look on the wall.
There are essentially two major types of gallery wall layouts: the grid layout and the free-form layout. There are infinite variations on these 2 themes.
But help, which layout do I chose?!
First, you need to choose whether or not you want the outer edges of your gallery aligned or not.
From there, you can arrange your frames in a million different combinations!

If you are someone who appreciates minimalism, simplicity and more modern interiors (ie Scandinavian interiors), then a more uniform grid layout might be a better choice for you.
To hang your pictures in a grid layout, make sure the outer frame edges stay aligned within the outer square or rectangular “grid” perimeter. You can use frames of all the same size, or you can play around with different size frames.
For a polished and orderly look, stick with fairly tight spacing in between each frame (ideally 2″/4″ max spacing between each frame).
Avoid using super bold statement frames in a grid layout – this type of gallery wall lends itself better to a more minimalistic aesthetic.
Here are some examples of grid gallery walls.


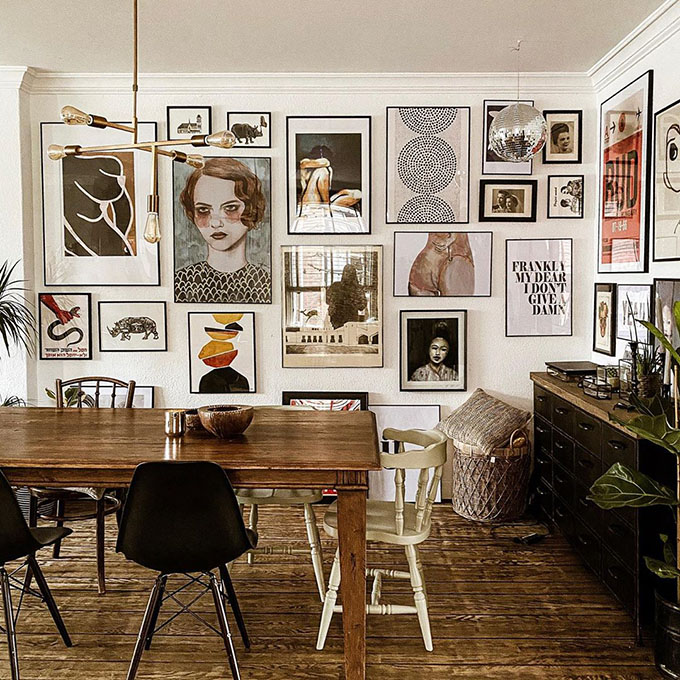
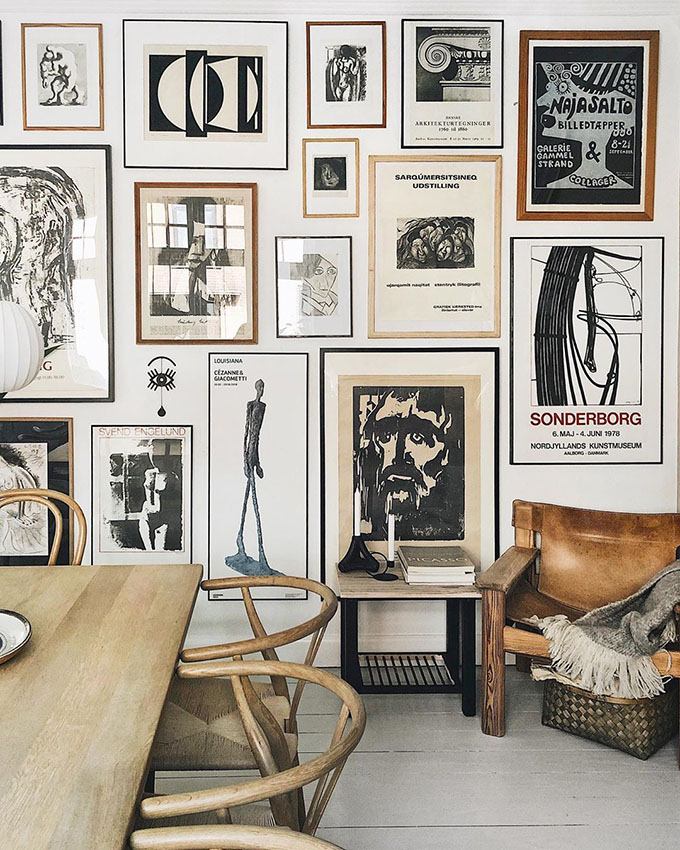
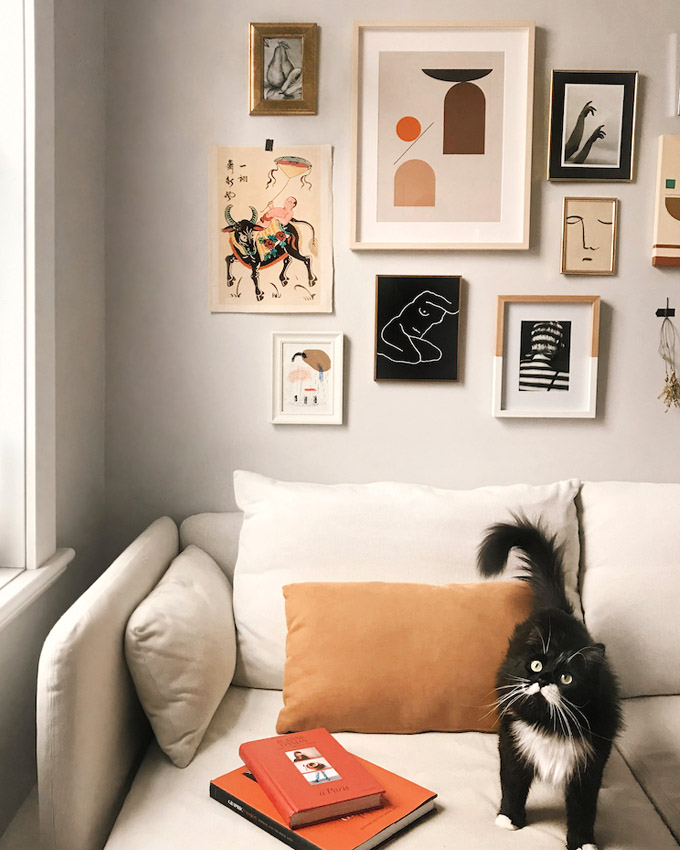
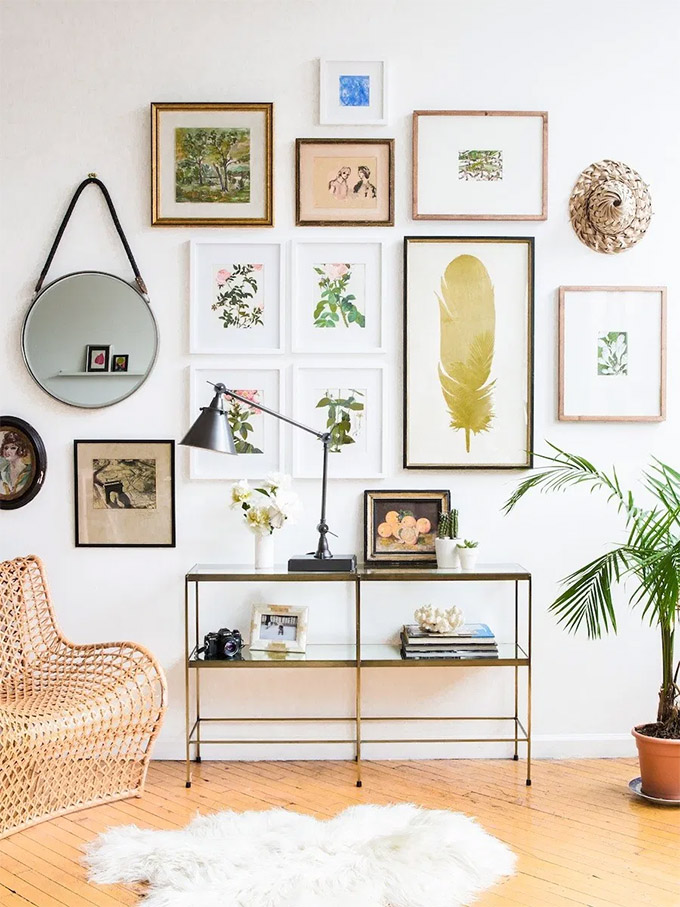
If you’re more drawn towards maximalism and bold or bohemian interiors, a free form approach could be the right style for you.
Free-form gallery walls are like having a collage of artwork on your wall. They take the eye on more of a journey than the more linear grid formation.
This might be a better layout for you if you find yourself switching up your artwork a lot.
It’s also great to start with a free-form gallery wall if you don’t have a lot of art pieces to start with; it leaves you more freedom to add more artwork gradually over time.
Most people creating a free-form gallery wall will start with an anchor piece and build everything out around it.
↓ QUICK TIP ↓
Looking to reign in the chaos in your free-form layout? Try aligning a few of the top edges and bottom edges of some of your frames. Creating some horizontal continuity can help make things look less crazy.
Here are some examples of free-form gallery walls.


Whichever layout you ultimately go with, keep these things in mind:
- don’t hang your artwork too high: the main focal point of the arrangement should be at about eye level
- for maximum impact, try a floor to ceiling gallery wall
Frames

If you’re going for a clean, minimalistic gallery wall, then look for frames that are on the thinner side, with no embellishments. Stay with neutral colors like light wood, black or white.
For a more traditional gallery wall, frames with slightly more ornate moldings can be used. Metallic (mainly gold and silver) frames could work in a traditional/eclectic setting.
For an eclectic gallery wall, consider mixing different types of frames (both ornate and simpler designs). Or, stick with simple frames and keep the diversity in the artwork itself.
You don’t have to frame all the pieces in your gallery wall. However the frames you do use should be chosen carefully. You should try to consider the frames as a part of the artwork!
Personally I usually hang large canvases directly on the wall unframed; and this little trick alone saves a lot of money on framing.
Word of warning: mixing a bunch of different colors, metallics, stained woods etc, could quickly become visually overwhelming. So unless this is the look you are going for, try to limit your frames to a maximum of three different finishes.
Not all the frame widths have to be identical, you can definitely have some variety in there. All the frames in the exact same width could actually look a little TOO perfect, so don’t be afraid to mix it up a little.
On the wall, space the frames evenly from each other for a cohesive look, at 2″ to 4″ away from each other. DON’T STRESS if it’s not perfect! It’s ok to eyeball stuff too.
↓ QUICK TIPS ↓
→ if you have a small piece of art, you can make it more impactful by using an oversized mat and a large frame
→ don’t mat everything the same way – play with a variety of different mounting options to keep things visually interesting
Thoughts on Buying Art

A good way to make sure your gallery wall has variety is to mix media. Combine vintage prints, original art, flea market paintings, photographs and maybe even textiles to create a story on your wall.
Try to include a range of different art media as well, like watercolor, oil, charcoal drawings, etc.
Original Art
It’s wonderful to be able to support artists by purchasing original artwork, but it can get really pricey.
If you’re looking into buying original art for your gallery wall, my best advice to you is to not rush it!
Take your time and pick art that really speaks to you.
Your gallery wall is likely going to be a major focal point in your home, so the last thing you want is to regret an expensive mistake every time you look at it.
Don’t worry if your wall looks a little bare while you figure out what you want.
Of course not ALL original art costs an arm and a leg: you can also find some fabulous originals at flea markets, garage sales and thrift stores, so don’t forget to check there!
Prints
Prints are another perfectly viable option for your gallery wall.
Printed digital reproductions of your favorite art can be a great option if you can’t afford the original piece and you still want to support and artist you love.
Personally, I would recommend staying away from fine art prints of very famous pieces of art (ie the Mona Lisa, Van Gogh’s sunflowers, Monet’s water lilies, etc). While those pieces are wonderful, there is a lot of other art in the world to discover and appreciate.
Premade Gallery Walls
This option works particularly well for folks who are intimidated by picking their own art and just want a gallery wall that looks great straight out of the box.
Obviously it won’t be as personal this way, but may prove useful in situations such as staging a home for sale or refreshing a vacation rental.
Check out Artfully Walls and Desenio, for super chic, pre-selected gallery walls.
Cohesion Is Key
It’s a good idea to aim for some cohesion within your gallery wall if you want to avoid making a hot mess out of it.
Elements that can create a unified aesthetic in a gallery are:
- using similar genres of artwork
- frames in very similar styles/colors
- the spacing between the frames is uniform
- the frame dimensions are all the same
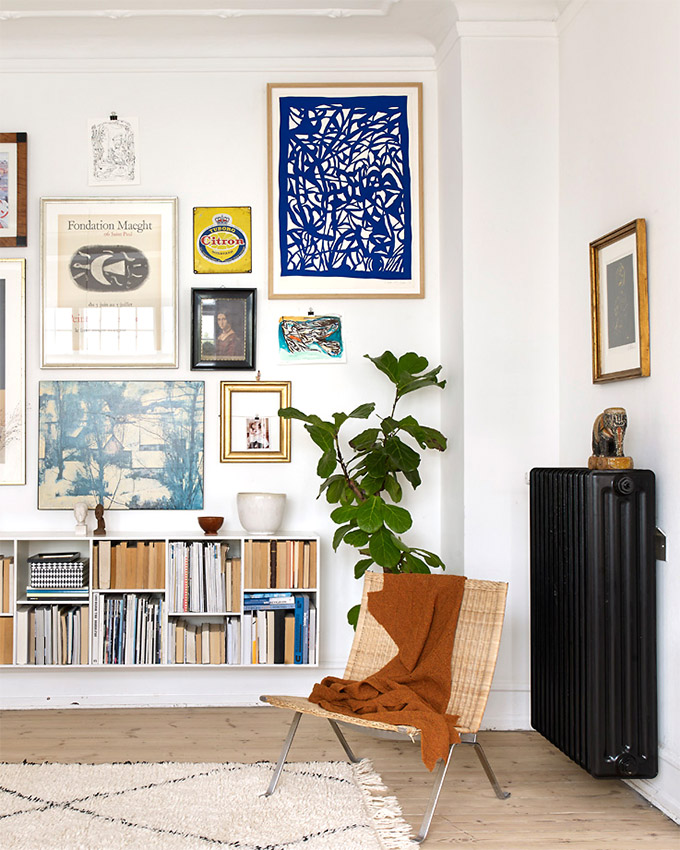
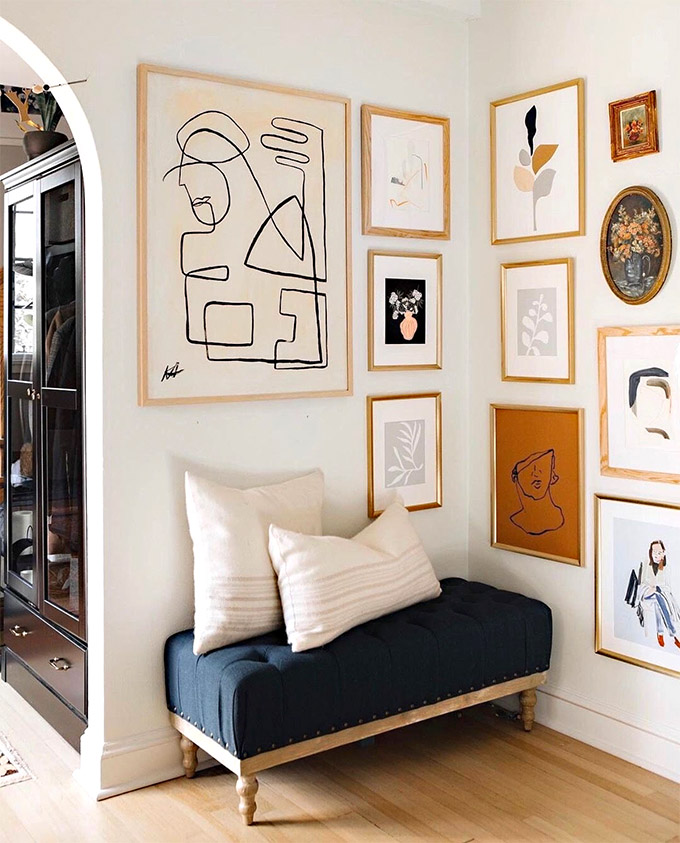
Building a Gallery Wall Around Furniture
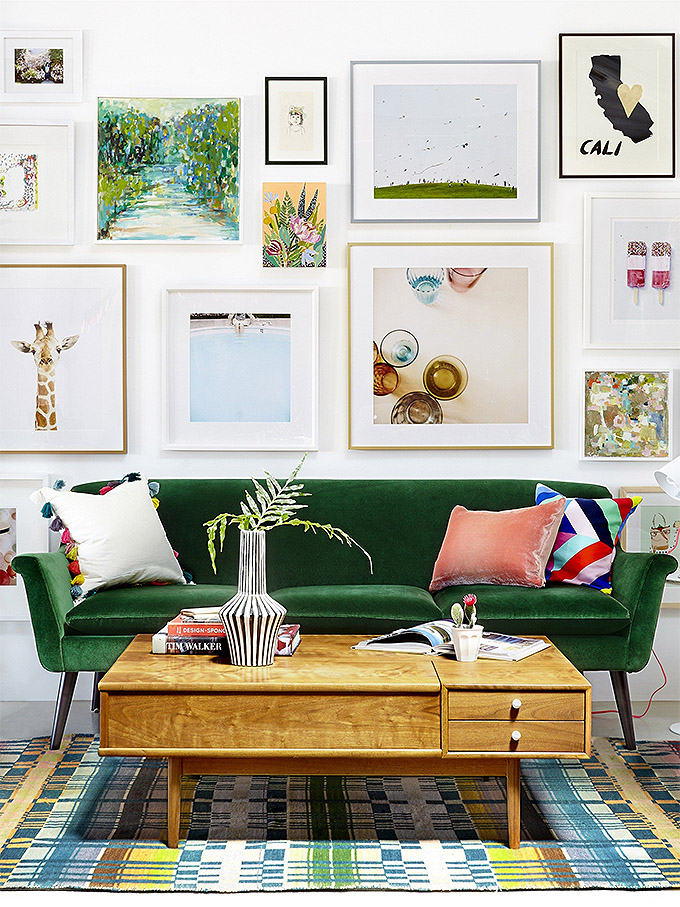
Gallery walls aren’t just for empty walls: often designers will build art walls around an existing piece of furniture to create a visually interesting vignette.
You can:
- Hang a selection of artwork around a chair or bench
- Create an art wall over a console table
- Hang a gallery wall over a sofa
- … Over a bookshelf
- … Around a television
↓ QUICK TIP ↓
If you’re installing artwork over furniture, leave some breathing space between the top of the furniture and the bottom of the frame (about 8″). If you leave too big of a gap, the art can lose its connection with the furniture and will appear to be awkwardly floating on your wall instead of being anchored.
Gallery walls over staircases

Gallery walls can be the perfect way to fill that wall space in a stairwell.
Staircase gallery walls tend to be a favorite location for displaying family photos but of course you can hang anything you like!
Corner Gallery Walls
If tackling one wall wasn’t enough, then you might be the perfect candidate for a corner gallery wall! 🤣
Corner gallery walls can be a great solution for an awkward corner that needs some jazzing up.
Picture Ledge Gallery Wall

Another popular way of displaying art is by standing it up on a picture ledge.
Using a picture ledge leaves a lot of freedom to change things up whenever you like, without having to break out the hammer and nails every time – aka this is much easier than hanging everything up.
Picture rail gallery walls also have a kind of sculptural feel to them that traditionally hung gallery walls don’t usually have.
I think the most appealing way to display art on picture ledges is by layering it. Place the larger pieces behind and layer smaller ones in front.
Shelf gallery walls can also be good for renters who are unable to put a lot of holes in the wall.
Budget Gallery Wall Ideas
If you’re on a really tight budget, you can still create a super impactful gallery wall without spending a lot.
Here are some of my favorite no/low budget gallery wall ideas:
Create a collage

Grab a few magazines and tear out all your favorite images. Then tape them to your wall and create an enormous collage.
I did this as a kid all the time and it instantly transformed my room! I used to like picking a theme: for example using all black and white photography.
You can also create a gallery wall collage out of photographs!

Use Thrifted Art

It’s always a little hit or miss, but sometimes you can find some great pieces at the thrift store or flea market.
The really great thing is that vintage artwork often comes already framed, so you can save even more money.
↓ QUICK TIP ↓
If you found a frame that you like at the thrift store, but don’t like the art inside it, just paint over the artwork! Sometimes a piece of art in a single, solid color can look really cool and intentional. Of course, the opposite is also true – love the art but hate the frame? Paint away!
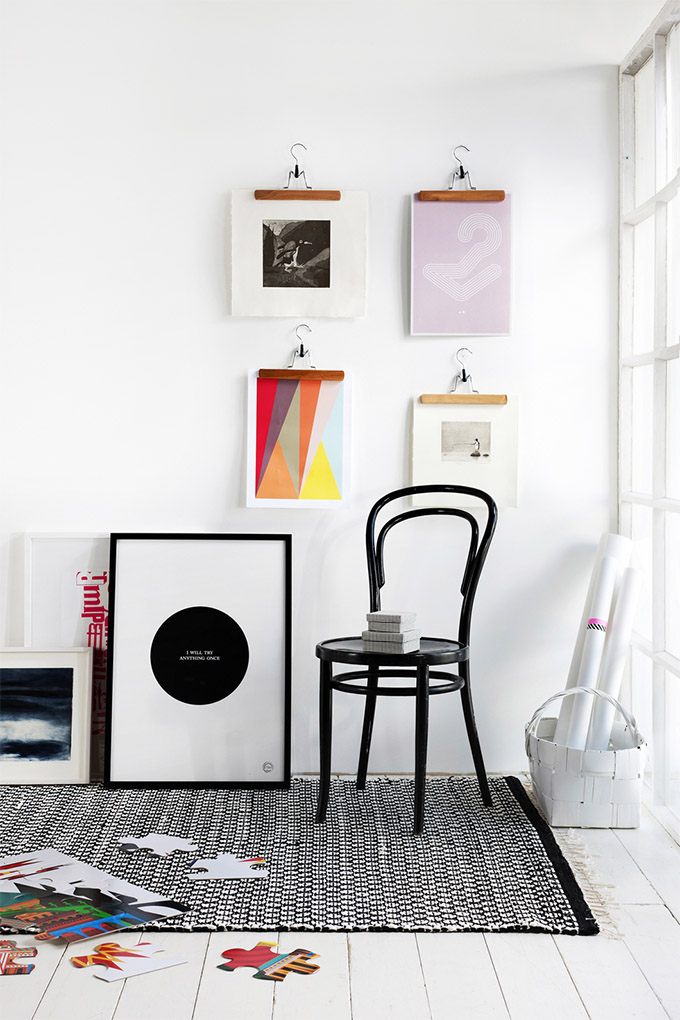
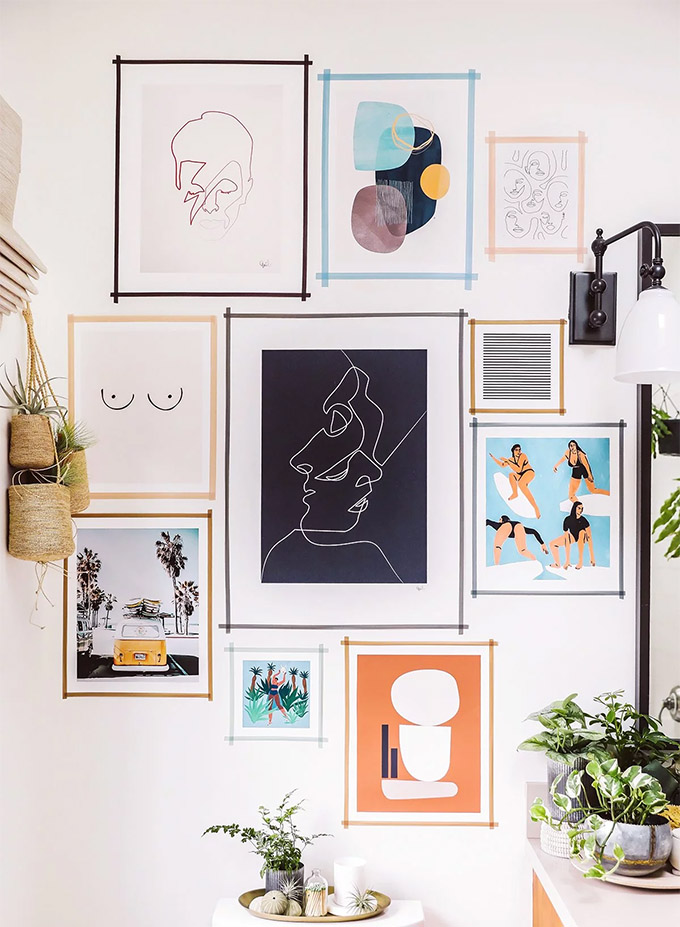
Frameless gallery walls
Going frameless is another great way to save money on your gallery wall. Even the cheapest IKEA frames or thrift store frames can add up fast if you need to buy enough of them!
Don’t worry though, a gallery wall without frames can look incredibly chic.
There are tons of ways to tastefully display your artwork without needing to frame it. Take a look at some of a couple of my favorite methods below:
Wooden trouser hangers
Washi tape
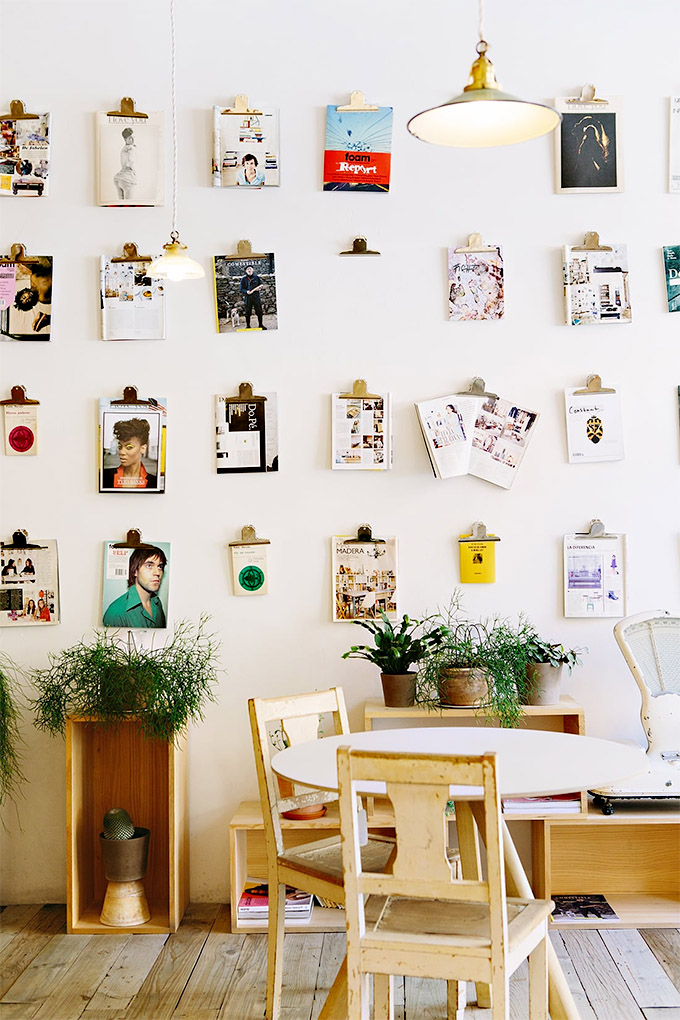
Wooden clip boards
Other Items to Include in a Gallery Wall
If you want to add some extra personality to your gallery wall, you might want to consider adding some of the following quirky elements.
Just remember to go easy with this stuff – use restraint because this shiz can get crazy fast!
- neon lights or signs
- shelves with small decorative objects or plants
- baskets
- hats
- musical instruments
- flowers
- mirrors
- fans
- masks
- textiles


So many great tips, thank you!! I used to have a lot of my photos/art on a shelf in our hallway, but unfortunately I misjudged the weight of it all and the shelf came crashing down last month. 🙁 Not only did my frames break, but I had to have my hardwood floors resurfaced too. I’ve been hesitant to decorate the hallway again, but your tips make a gallery wall seem much more attainable. Thanks again!
This is probably the most useful and well-explained article I’ve read in recent years.
Thank you!
It’s so cool that you elaborated on how we could select artwork pieces for a gallery wall. My wife and I are excited to start decorating our new house. We’d like to create a gallery wall and start buying artwork next week, so we’ll be sure to read your tips very carefully. Thanks for the advice on using different art media for a gallery wall to create an interesting story.
hey this was super helpful ! thank you for taking the time to create this!
thank you Sean!!
Excellent article! Very helpful. Lucky for me I just happened to find your site. I signed up for the monthly email and I’m looking forward to seeing your other ideas.
Good ideas. Liked the classification of grid style and free flow the most. Keep going you are doing good job.